The water in your well doesn’t get contaminated deep underground first. In almost every case I’ve seen, trouble starts within a few metres of the wellhead, right where you’re standing. A cracked seal, a puddle that drains toward the casing, a new soak pit dug too close, and suddenly the water that tested clean last year isn’t clean anymore. A solid well source protection checklist is how you catch those problems before they reach your tap.
I’ve maintained my own borewell, pump and overhead tank for over 15 years, and the single biggest lesson is this: protecting your water is mostly an above-ground job. This guide walks you around your wellhead and the land around it, season by season, so you know exactly what to inspect and why it matters. It pairs well with our complete guide to private wells and water sources.
Key Takeaways
- Most well contamination enters near the surface, not from deep aquifers, so guard the wellhead first.
- Keep septic tanks, soak pits and animal pens a safe distance away, usually at least 15 metres (roughly 50 feet), and more where soil is sandy or land slopes toward the well.
- Ground should slope away from your casing so rain and wastewater never pool against it.
- Run a quick visual check every season and a full inspection each year; test the water at a certified lab at least once a year.
- A sealed cap, an intact concrete apron and clean surroundings prevent far more problems than any filter can fix.
Why source protection beats filtration every time

Filters and purifiers treat water after it’s already reached your home. Source protection stops the pollution from getting into the well in the first place. That distinction matters because the nastiest contaminants, bacteria from sewage, nitrates from fertiliser, fuel and pesticide runoff, are exactly the ones a basic filter struggles with.
To prevent well contamination, think of your wellhead as a doorway. If the door is shut and the ground around it is clean, very little bad stuff gets in. If the door is cracked open, no downstream filter fully makes up for it. That’s why every point on this checklist focuses on sealing the entry points and clearing the surroundings.
The wellhead: your first line of defence
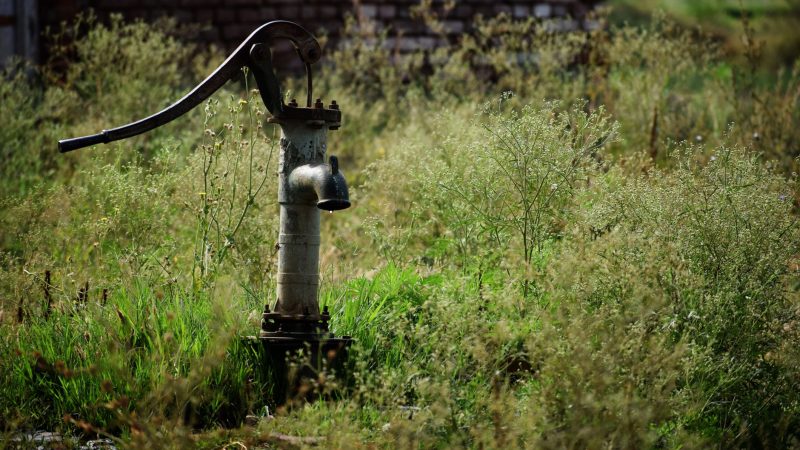
Good wellhead protection is the highest-value work you’ll do. Walk right up to the casing and check these, top to bottom.
Cap and seal
- Is there a sealed, vermin-proof cap or cover on the casing? An open pipe is an open invitation to insects, lizards, dust and rainwater.
- Is the cap bolted or clamped, not just resting on top? A loose cover blows off or gets nudged aside.
- Is the vent (if fitted) screened and facing down, so it breathes without letting bugs in?
- Are cable and pipe entry points sealed with a proper grommet or seal, not stuffed with cloth or left gaping?
Casing and apron
- Does the casing stand at least 30-45 cm (about 12-18 inches) above ground, so surface water can’t run over the rim?
- Is there a concrete apron or platform around the base, sloping outward to shed water?
- Are there any cracks in the apron or gaps between concrete and casing? Hairline cracks widen and channel water straight down alongside the pipe.
- Is the casing itself free of rust holes, dents or splits?
Tip: On my own borewell, the sneakiest fault I ever found was a thin gap where the concrete apron had shrunk away from the casing over a couple of monsoons. It looked like nothing, but during heavy rain it funnelled surface water straight down the outside of the pipe. A tube of good polyurethane sealant, roughly ₹250, ₹500, fixed it in ten minutes and stopped a yearly muddy-water problem.
Safe distances: the numbers that keep sewage out
The most common way well water goes bad is a pollution source sitting too close. Use this safe well distance checklist as a starting point, and increase the gaps if your soil is sandy or gravelly, if land slopes toward the well, or if the water table is high. Local rules may set stricter minimums, so check them too.
| Potential pollution source | Suggested minimum distance | Why |
|---|---|---|
| Septic tank | 15 m (≈50 ft) | Leaks and overflow carry bacteria and nitrates |
| Soak pit / leach field | 30 m (≈100 ft) | Wastewater soaks directly into soil here |
| Animal pen or manure pile | 15-30 m | Droppings are a major bacterial source |
| Fuel or chemical storage | 15 m+ | Spills and seepage are hard to reverse |
| Compost / rubbish pit | 15 m | Rot and runoff leach into groundwater |
| Buried fuel or gas line | 15 m+ | Slow leaks can persist unnoticed |
One point people miss: distance works alongside direction. A septic tank uphill of your well is riskier than one the same distance downhill, because groundwater and surface runoff both travel downslope. If you can, keep pollution sources on the low side of the land.
Drainage and land use around the well
Once the wellhead is sealed and distances are sorted, the surrounding land is what’s left to manage. This is where good habits quietly protect a borewell from pollution year after year.
- Slope: Land should fall away from the casing on all sides. If water pools near the well after rain, regrade or add a small mound.
- Runoff: Keep the well clear of the path where roof drains, yard washdown or lane runoff naturally flow.
- Chemicals: Don’t mix pesticides, wash sprayers, or store fertiliser near the wellhead. Move vehicle washing and oil changes well away.
- Vegetation: Keep grass short and roots clear of the casing, but avoid heavy chemical weed-killing right beside it.
- Abandoned wells: An old, unused borewell nearby is a direct pipe to the aquifer. Get it properly sealed by a professional.
The printable seasonal protection checklist
Here’s the routine I follow. Do the quick visual walk-around each season, and set aside an hour once a year for the full inspection. Jot the date and what you found each time so you can spot slow changes.
Every season (5-minute walk-around)
- Check the cap is on tight and undamaged.
- Look for cracks or new gaps in the apron around the base.
- Confirm no water is pooling against the casing.
- Scan for new activity nearby: fresh digging, a new pen, stored chemicals.
- Sniff and eyeball a glass of water for any change in smell, colour or cloudiness.
Once a year (full inspection)
- Remove and inspect the cap, vent screen and all seals; replace anything perished.
- Measure casing height above ground and re-seal any casing-to-apron gap.
- Re-check every safe distance in the table above, especially anything built or dug in the last year.
- Walk the drainage after a heavy rain to see where water actually goes.
- Collect a sample and send it to a certified lab for a bacterial and chemical test.
- Log the results and compare them with last year’s.
Testing is the one step you can’t eyeball. Clear, odourless water can still carry bacteria or nitrates. In my experience a basic well-water lab test usually costs roughly ₹500, ₹2,000 depending on how many parameters you check, and it’s the cheapest insurance you’ll buy all year. For guidance on drinking-water standards, India’s Bureau of Indian Standards and the World Health Organization both publish reference values, and the Central Ground Water Board is a useful source on local groundwater conditions. Always confirm your results with a certified lab or a qualified professional before treating any health concern.
Warning: If your water suddenly turns cloudy, smells odd, or your household gets stomach upsets, stop drinking it, switch to a safe alternative, and get it tested before you do anything else. Sudden changes after heavy rain or nearby construction are a classic sign that surface pollution has reached the well.
Common protection mistakes to avoid
A few errors show up again and again. Dodging them puts you ahead of most well owners. For a fuller rundown, see our guide to common well mistakes that cost homeowners money.
- Leaving the casing flush with the ground so rain runs straight in.
- Trusting a filter to fix a source problem it was never designed to handle.
- Assuming “it’s always been fine” and skipping the yearly lab test. Plenty of well water myths keep owners from testing at all.
- Digging a new soak pit or pen without checking the distance to the well first.
- Ignoring an old abandoned well on the property.
Frequently Asked Questions
How do I keep my well from getting contaminated?
Focus on the surface. Keep the casing capped and raised above ground, maintain a crack-free concrete apron that sheds water, slope the land away from the well, and keep septic tanks, animal waste and chemicals a safe distance off. Then test yearly to catch anything you missed.
How far should a well be from a septic tank?
A common minimum is about 15 metres (roughly 50 feet) from a septic tank, and around 30 metres from a soak pit or leach field. Increase those gaps in sandy soil or where land slopes from the tank toward the well. Local rules may require more, so check them.
What should I check around my wellhead?
Check that the cap is sealed and tight, the casing rises well above ground, the apron has no cracks or gaps, and water drains away rather than pooling. Then scan the surroundings for new pollution sources, stored chemicals, and any old unused wells nearby.
How often should I inspect and test my well?
Do a quick five-minute visual walk-around every season, and a full inspection once a year. Send a water sample to a certified lab at least annually, and immediately after any flooding, nearby construction, or a noticeable change in taste, smell or clarity.
Can I protect my well myself, or do I need a professional?
Most of this checklist is DIY: capping, sealing gaps, improving drainage and clearing the surroundings. Call a professional for sealing an abandoned well, major casing or apron repairs, and for the lab testing that confirms whether your water is actually safe to drink.
So, where does that leave you?
Protecting your water isn’t complicated, but it does need attention above ground where the real risks live. Seal the wellhead, respect the safe distances, keep the surroundings clean and draining away, and test once a year. Do that and you’ve handled the vast majority of what causes contaminated well water. If you want the bigger picture on owning and running a private well, our complete homeowner’s guide to private wells ties it all together, and the private well FAQ answers the questions owners ask most. Print this checklist, tape it inside a cupboard, and give your wellhead a look this weekend.